|
|
 |
|
 CloneDVD Using the Application CloneDVD Using the Application |
|
The User Interface is very simple and you will notice that CloneDVD does not have any menus. It is a Filmstrip that takes you through all the settings step by step, until the copying process can start. All the settings you need to adjust are in the Filmstrip! You cannot overlook anything! If you have not selected any necessary information, you cannot reach the next screen of the Filmstrip. The “Next” button will remain inactivated until you select all of the required information.

 HINT: Use the right mouse button! Apart from the context sensitive help, some additional functions can only be selected via the right mouse button. The symbol on the left will call your attention to right mouse button context menus in this manual.
Start Screen
Please make sure that you have everything needed for copying:
- a DVD-Reader
- suitable DVD-Recordable media
- a DVD-Writer
- the original movie
- sufficient hard-disk space
Double-click the CloneDVD Desktop Icon to open the Start Screen of CloneDVD and the first screen of the Filmstrip.

Here you decide which elements of the movie you wish to copy. You can copy one DVD title (for example only the main movie), several titles or the whole DVD. You can also copy the original menu or take it out. There are three categories of backup for you to choose from:
- “Copy DVD Titles”: Here you can copy one or more DVD titles, with or without the original menu. DVD titles you have not selected will be marked gray in the menu
- “Clone DVD”: Here you can copy all titles including the original menu
- “Write Existing Data”: Different file formats can be selected, created and saved under “output method” (DVD Files or ISO/UDF Image). You also have the option to proceed with existing DVD files from your hard disk or other source. This is rather suitable for advanced and experienced users
NOTE: The following chapter describes the first two backup categories. The third backup category requires a slightly different approach and user configuration – this will be described later in the document.
HINT: You should visit our website to download existing updates. To do so, click the elby logo in the bottom left corner which takes you automatically to your internet browser.
Select Title/s
Choose the drive where the original DVD is inserted. The data files of the original DVD will be loaded.
NOTE: You will see an error message if your DVD is CSS-encoded and CloneDVD cannot load your DVD, (please refer to the information under “What you should know”).

On the right hand side you wil see the title selection and on the left hand side either the movie preview (which is started by default) or an overview about the Audio and Subtitle Settings that are possible for the selected title.
The titles are preselected according to the chosen category:
- For “Copy DVD Titles“, only the main movie, without menus, is preselected
- For “Clone DVD“, all titles and menus are preselected
In any situation, you can change the title selection according to your personal preferences. The backup categories only describe a preselection of options, to make the program easier to use.
You can make the following selections:
- Title selection: Here you will find a list of all available titles from the original DVD. For each title, you will see the playback time, chapter count and original audio settings (audio tracks and subtitles). You can select one or more titles. Mark the checkbox corresponding to the title/s that you want to backup and the selected titles will be highlighted accordingly
With a click with the right mouse bottom in the title selection you open the following context menu:
- “Select all”: This function selects all of the titles
- “Invert all”: This function inverts your title selection
- “Invert for split”: This function is only activated if you keep the menu. With this option you can invert your chapter and title selection. This is very important if you like to split one DVD over two DVD media!
- “Information”: Opens the context help
- Sorting order: By default, the titles are ordered by playback time. You can change the sorting criteria to title number or chapter count. Simply click on the corresponding column description
- Chapter cutting: You have the possibility to cut off unwanted chapters or to split one movie in two parts. Click on the scissors to open the control element for cutting off unwanted chapters. Another bar appears below the play bar. The small points symbolize the chapters, the space shows the approximate length of each chapter. You can move the blue triangles to cut off unwanted chapters. Either you click on the orange bar to move the blue triangles step by step or you directly drag it to the chapter where you like to have it. The Play Slider above automatically moves to the position of the triangles so that you can watch the first movie scenes from each chapter. The green writing in the preview window shows you the chosen chapter and its play time. On the right hand side, in the title selection, you can see the chapter selection with each title
- Splitting: If you want to copy the whole DVD or you want to copy a movie with extra length, it is advisable to split it over two DVD media. First of all you have to select “preserve menus” for keeping the overview. Via the “chapter cutting” function you can split the main movie in two parts while selecting for example the chapters 1-9 for the first DVD media. Select now further titles like “Special Features” and start the copying process for the first DVD media. When the copying process has finished, please click on the “Back” button until you reach the window with the title selection. Please click with the right mouse button into the title selection dialogue: You can invert your selection for the first DVD media, like in this example, it means that the chapters 10-16 of the main movie and the rest of the titles will be automatically selected
HINT: If you want to split a multi-angle movie, please cut off the same chapters for each camera angle. You can easily recognize titles with different camera angles, as they all have the same playing time!
- Movie preview: You can start the movie preview by first clicking on a title and then clicking on the “Play“-button (green triangle) right below the preview panel. You can change the playback speed (1x-8x) by using the right mouse button inside the preview panel. The movie preview allows you to easily identify each title required for backup
You can change the playback speed (1x-8x) by using the right mouse button inside the preview panel. Besides, you can increase the size of the panel by selecting the menu item “Best fit”. With “What’s this” you open the context help
- Menu: You can copy the original DVD menu by selecting the “Preserve menus” checkbox in the upper right-hand corner of the window. NOTE: If you want to split the original DVD you have to preserve the menu (please see “Splitting”)
- FirstPlay: If you don't want to copy the DVD menu, but decide to select more than one title, you must specify which title should be played on insertion of the DVD (“FirstPlay“). To select the “FirstPlay“ title, all you need to do is click just to the left of the title’s displayed “Play time“ for the preferred title – a small green triangular arrow will indicate the FirstPlay title. By default, the title with the longest playtime (which is usually the main movie) is preselected
- Quality bar: This quality bar gives you an idea of how much the compression (see help manual "Before you begin") of the data affects the movie quality. The more titles you choose to include, the more the movie quality will decrease. You should avoid the red area!
- Target Size: Here you can adjust the target size yourself. You can choose between a DVD-5 or Custom settings (100 MB to 9999 MB). The quality bar aside shows you the corresponding compression depending on the title selection as well as the target size and thus the quality of the movie copy. Trough the quality bar you have the direct correlation between title selection, target size and quality. In the next window you’ll find a second quality bar which is more exact and includes the audio and subtitle selection
Now click “Next”.
Audio and Subtitle Settings
Most movies offer various Audio and Subtitle selections, such as Languages, Subtitles, Audio encoding (Dolby AC-3, DTS), Audio properties (like the director’s commentary) and Audio Channels.
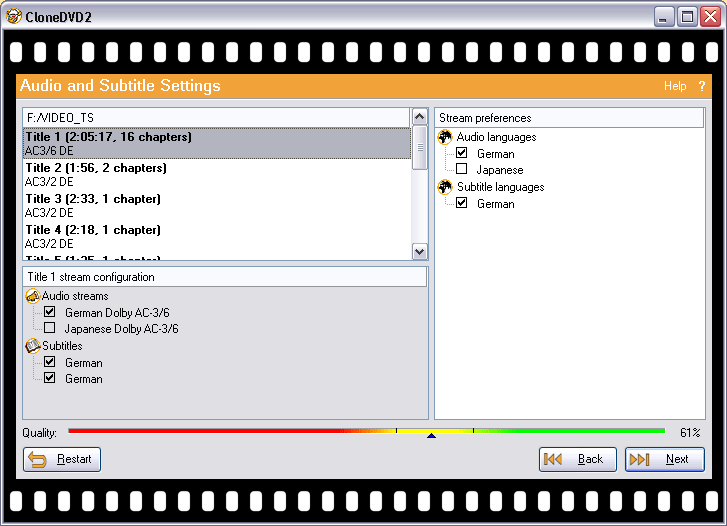
The second quality bar scans your title and chapter selection and gives a more exact idea of the picture quality as in the last window. Besides it shows the final influence of the audio selection on the quality. The two lines show the possible minimum and maximum value, depending on your audio selection.
On the right hand side of the window you will find all the settings for the selected title in the particular movie chapter. Here you can make personal selections about the backup process. CloneDVD will memorize these preferences until the next time you start the program. For example, maybe you like watching your movies in German and English without subtitles and with Dolby AC-3. Please make your personal selection now!
On the left hand side you will find all the settings of each of your selected title/s. Please choose in the upper left window the title where you want to make a selection. The corresponding language and subtitle settings will be shown in the left bottom window. Each title has different settings. Depending on the selection of your preferences on the right hand side, the settings on the left hand side will be tailored to suit.
NOTE: CloneDVD only memorizes the settings on the right hand side (preferences). We recommend you select your preferred settings on the right hand side and only correct the settings of each single title by exception.
You can make the following selections:
- Language: Select the spoken language for your personal movie backup
- Audio properties: Among these options are features like the director's commentary and closed caption for the handicapped
- Audio encoding: Select the different audio encodings you want to copy. Note that DTS uses more space than Dolby AC-3
- Dolby AC-3/Dolby Digital: “Audio Compression 3” provides you with true Surround-Sound. It is a real multi-channel technology usually comprising six channels (5.1) or a maximum of seven (6.1). On DVDs the sample rate is 48 KHz at 448 Kbit/s
- DTS: Digital Theatre Sound also provides true Surround Sound and is considered superior to AC3, however, not all DVD players support this format. On a DVD the sample rate is 48 KHz at 768 Kbit/s. Up to to eight channels can be supported
- Audio channels: Select the preferred number of audio channels
- Subtitle languages: Select your preferred subtitle languages
- Subtitle properties: Among these properties are subtitles for the hard-of-hearing and subtitles for children
Output Method
On the lefthand side, you will find a summary of your selected titles and properties. The “FirstPlay“ title is still marked with the green triangle. On the right-hand side, you can select the preferred output method which is independent of the Start Window backup categories.

You have three options:
- DVD Files: DVD files are the basis for creating an ISO/UDF image which can be played with any DVD playback software on your computer. Creating the DVD files first allows you to check the quality of the transcoder before proceeding any further. If you're happy with the results, you can write them by using the third backup category “Process Movie Data”
- ISO/UDF Image: Image files are very useful for archiving, as they contain all the movie data in one single file and don not need to be prepared any further before writing to a DVD-Recordable
- DVD Writer: If you want to make a direct copy of a movie, please insert a DVD-Recordable disc into your writer and select “DVD writer”. Your personal configuration of movie and audio selections will be transcoded and burned to the DVD-Recordable in one step from this point
NOTE: If you want to copy your footage directly on a DVD media you can select your preferred writing speed. If you select “Maximum” speed your DVD writer decides which speed it takes. There can be errors in the communication between the DVD writer and the DVD media. Therefore it is recommendable to adjust the speed that is written on your DVD media.
Depending on the type of output, you will need to select appropriate output targets:
- With DVD Files and ISO/UDF Images, please select the folder where you want to save the resulting files
- If you want to make a direct copy, please select your preferred DVD writer in the drive selection window. You can manually change the writing speed of your DVD writer to the maximum speed of your DVD blank media
- When generating an image or copying directly, you can optionally select the folder where you want to store the temporary files that are generated while transcoding
Now click on “Go!”. The Filmstrip will proceed to the last screen.
Transcoding and Writing
On the left hand side you can either see snapshots of the movie during the transcoding process, a final summary of all the selected and tailored settings, .or log window which shows the processing tasks. Various animations provide a backdrop during the process!

The following panels are available:
- Snapshot window: Picture Snapshots show which parts of the movie are transcoded at the moment. You can change the update frequency as you like to. The higher the update frequency the slower the transcoding process!
- Summary: Here you can see all parts of your personal selection
- Log window: Here you can see the processes which CloneDVD does at the moment
You can open the following context menu with a right click into the log window:
- “Clear”: Here you can delete the content of the Log window
- “Save”: Saves technical details about the copying process at the last selected directory
- “Save as”: Here you can save technical details about the copying process on the hard disk
- “Debugging information”: Shows technical details about debugging
- “What’s this?”: Opens the context help
On the right hand side you can watch the progress of the transcoding and imaging or writing procedure. Meanwhile you can toggle between the animation and graphically presented bit-rate statistics. Click once on the animation to reach the video bit-rate statistics and to find out more about the frame statistics, click once on the video bit-rate statistics.
- Animations: If you do not like the sheep animation you can load your own animations. Simply put your animation into the following directory: C:\Program Files\Elaborate Bytes\CloneDVD2\. Animation format: .gif or .png format; 336 x 135 pixels
With a right click on the animation you can open the following context menu:
- “Animation enabled”: Here you can activate and deactivate the animation
- “Select processing animation”: Here you can select the wanted animation during processing
- “Select writing animation”: Here you can select the chosen animation during the writing process
- “Reset animations”: Click here to load the original animation/li>
- “What’s this?”: Opens the context help
- Video bit-rate and frame statistics: Graphically presented bit-rate and frame statistics inform you in realtime about the properties of the video input and output data. The area of the video bit-rate statistics goes from 0-10 MBts, the lines of the frames statistics show the sizes: The area goes from 0 KB to 150 KB
|
|
